Showing posts with label Project. Show all posts

Wednesday, April 22, 2009

Project: Kabuto

It's Spring, so time to get working on new projects. I am wanting to remake and retool my armor. The first thing I'm wanting to do, and one that I have been wanting to do for some time is make a new Kabuto. I am getting the pieces of my shop in order to begin working on it very soon. I will post images and updates when I begin working on it.

For my new Kabuto, I'm wanting to alter and enhance certain aspects of my current one. I have some ideas of what I want out of the new one.
  1. Removeable mempo/bar-grill.
  2. Mempo/Bar-grill that can be attached or removed with preferribly one hand, and definatley without taking my fingered gauntlets off.
  3. Increase the length of the mabizashi (brow).
  4. Have more defined fukigaeshi (wings).
  5. Form the hachi (bowl) to more accurate shape.
  6. Shape the shikioro better to fit over shoulders.
  7. Make it look more period overall.
  8. Have several styles of mempos for various occasions.

Don't know if I'll be able to accomplish any or all of that. The most important thing is the removable mempo/bar-grill and to be able to add and remove it without taking off my gauntlets. The rest are less important, but still something I want to strive for. We'll see what I can get done.

Tuesday, August 26, 2008

Project: Silk Banner

I've wanted to make a silk banner for some time now. I did some research, asked a few people for help and information, bought the stuff I needed, and thanks to Toen for the silk, and Kirstyn for helping with the dyes and frame, I now have a fancy new silk banner. It is my first attempt, and there are some mistakes, but it passes the 15 foot rule. And I know more now for the next time.

My first attempt I did a more European style banner. It is more like a pendant and tapered on one end. Meant to fly horizontally. My next one for me will be a Japanese style which will fly vertically. Below are some of the pictures of the process. Click on any picture for a larger, more detailed image.

The silk being stretched on the frame and with the pattern already drawn on it in pencil, and the basics outlines of the banner in gutta. The outline looks jagged and wavy because it's on the frame, not because we were drunk. The pattern was done before putting it on the frame, then when on the frame, distorts pattern. When it comes off the frame, it's back to normal.


Now the gutta has been applied to the silk to form the Calon Cross and my mon. The gutta acts like a dye damn. It stops the different color of dyes from crossing over into another color. It's really cool to see happen.

The dyes have been applied. I did two coats of dye, mainly because the first coat was too streaky. I think I applied it wrong by using foam brushes. It soaked up the dye, but it didn't allow it spread too easily. You can still see the streaks in the blue, but they are not as noticeable. The purple and yellow came out really well.


The finished banner with it's ties and binding edge added. I used some bias tape for the binding edge and the ties. You can see the streaks in the blue. The purple faded a little during the fixative and washing phases. But it looks more faded in this picture than in actuality. The sun is shining behind it. Not sure what the final length is, but it's over six feet long, and it flys beautifully. I will be breaking it out this weekend at Valor.

Monday, March 24, 2008

My evil is showing

Ahem.... well, let's just say that the seal Crest did not make the trip to Coronation. I do have pictures of it before it died though, and will be posting those later. But the fact that the seal didn't make it, is not the most interesting story of this project. Let me take you back.....

As I stated earlier, I was wanting to make a Baby Seal crest out of jello and rice crispy treats for Coronation. I wanted the jello to be red, and possibly have spaghetti in it so it'd look like guts when it was hit. So I put it in a bottle since I wanted a basic cylinder of jello. And as of last post, I have not cut the jello out yet.

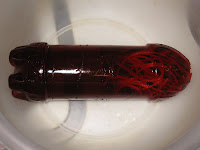
What I failed to realize was what the jello would look like after removed from the bottle. I literally was cutting the plastic away from the Jello, and it was coming out perfectly, and then I realized what I was holding in my hand, and bust out laughing so hard I almost dropped it. I laughed so hard, Con in the other room had to ask what was so funny. The picture of what came out of the mold is below. I'll let you draw your own conclusions.

Tuesday, March 18, 2008

Shhh..... evil genius at work

Ok, maybe not genius.

Started experimenting with the components of my Seal Crest for the Coronation tournament this weekend. The Crest needs to be at least 9" tall, so he will have to be sitting up somewhat. So I need something that will keep him from falling over, or breaking.

So I was thinking of cherry jello for the innards. But how to make it be in a tube that would represent the body? While I was shopping for jello yesterday, it came to me. Water bottles! I can empty out the water bottles and fill it with cherry jello. When it forms, I just cut the plastic bottle away, and I should have a solid jiggly mass.

I experimented with this last night and it appears that it's going to work well. I haven't cut the bottle off yet, but it looks like it will work.

Too add some more "flavor", I made up some spaghetti and put it in the jello as it set-up. It has a nice effect, and will probably make it more sturdy, but unfortunately it is not working how I imagined. I made two samples, and added the pasta right away, while the jello was still hot and liquid. The other one I waited an hour and it had set-up a little. The first one, the pasta settled at the bottom. The second one, the pasta floated. If I want to do this right, I need to find a medium where the pasta will just "float" in the jello. But, with everything else, this is a minor glitch, and not important to the whole concept.

Tonight I'm going to make up the "skin" out of rice crispy treats. I'm going to see how easy it is to form the treat and make it look like something. If all goes well, my Seal Crest may come "alive" tomorrow or Thursday night. There will be pictures. Bwah-ha-ha-ha-ha!!!!

Now I have to figure out how to secure it to my helm.....

Tuesday, March 11, 2008

Projects Update


My Shield Cover project is almost done. I have updated the images to my Flickr Project site. All that is left is to put on the device and make it purdy. But the basis of the project is complete. I will use this as a pattern to make more so that I can swap in different shield designs as I need it. My original plan is to make a different cover for each person who uses my shield, so they can show their own "colors". That's still the plan, but we'll see how adventurous I get with upcoming projects I'm wanting to do.

Since this one is coming to an end, I should be thinking of what I want to do next. There are several I want to tackle, but not sure which one will be next. Some possibilities are:

  • Silk Banner: I have been wanting to do this for some time. I went over to Toen's and laid out a design for mine, I just have not had the time to go back and finish it. So I'm thinking of building my own stretching frame and getting supplies and doing it myself in my garage. That way I can make more, and make some of others. I'm looking around for plans on how to make the banners as well as the stretching frame.
  • Workshop: Seems pretty logical, but I'm wanting a workshop. I have a double-car garage, which half of it isn't being utilized. So I was wanting to get it organized and equipped to do some work in there, including metalsmithing. I could use another helmet and gauntlets.
  • New Japanese Kit: This is basically a gimme. Last weekend we did a leather run and I got myself some more leather to make myself new armor. I've learned a few things since making my first kit, and I have some ideas on how to make a new one that will be better than my current kit. I haven't decided on the colors yet, if I'm to change.
  • Bushkazi Weapons: I love Bushkazi. But one of the problems with it being more popular is that the weapons used can be too specific for a general fighter. So I thought for this year's M&M event, I'd make all the weapons for it, so not to worry about if enough people brought the proper weapons. Plus I can use these for future years, and a possible Lilies Bushkazi Tournament I'm thinking about hosting.
  • Crest: At Coronation in a couple of weeks, I will be fighting in a Crest Fallen tournament. The point is that each fighter will have a crest on their helm, and they are defeated when their crest has been beaten. I have to build a crest for the tournament, that will not only be cool, but also have a good splatter effect.
  • Tent Supports: I need to make myself some new support poles and a ridge pole for my tent. It didn't end well last year, but we live and learn. So now I need to take what I've learned and build it better. Not hard, just takes time and space to work.
So, I have stuff on my plate. Just have to decide which to do first. Suggestions?

Saturday, February 16, 2008

New Project: Shield Cover


The winter months are coming to an end, and it's time for me to start getting my stuff back in functional shape. My first project is to get my shield back into shape. Since I'm going to try to fight with it more, I want it to be functional, and of course look nice. It has been sitting in the back of my van for so long, it got neglected. Some water got on it and it looks like it oxidized the paint in places. The first time I fought with it in months, the first hit to it, paint exploded off it. Now it looks pretty beat-up.

More images of my poor shield are in my Flickr set which you can find on the right side of this page.

My plan is to make a fabric cover for it. I've seen more people are doing that now, and I really like the idea. What I will do is make a cover out of trigger or duck cloth that I can slip over my shield, and tighten it with a pullstring. On the cover will be my device. Now if it gets dirty, or I need to make a repair, I just take off the cover and do it, instead of having to repaint the entire thing. Plus, if I wanted to make several covers, I could swap them out easily.

Another plus is that with some of our newer fighters, I could loan them my shield so they could fight and authorize. And to make it more personal, make a cover for each of them so they could have their own presence on the field. It's not terribly important, but I think it'd be a neat bonus.

As I make the cover, I'll document as best I can for anyone who may be interested or reading this..... all none of you. :)

Mata-ne